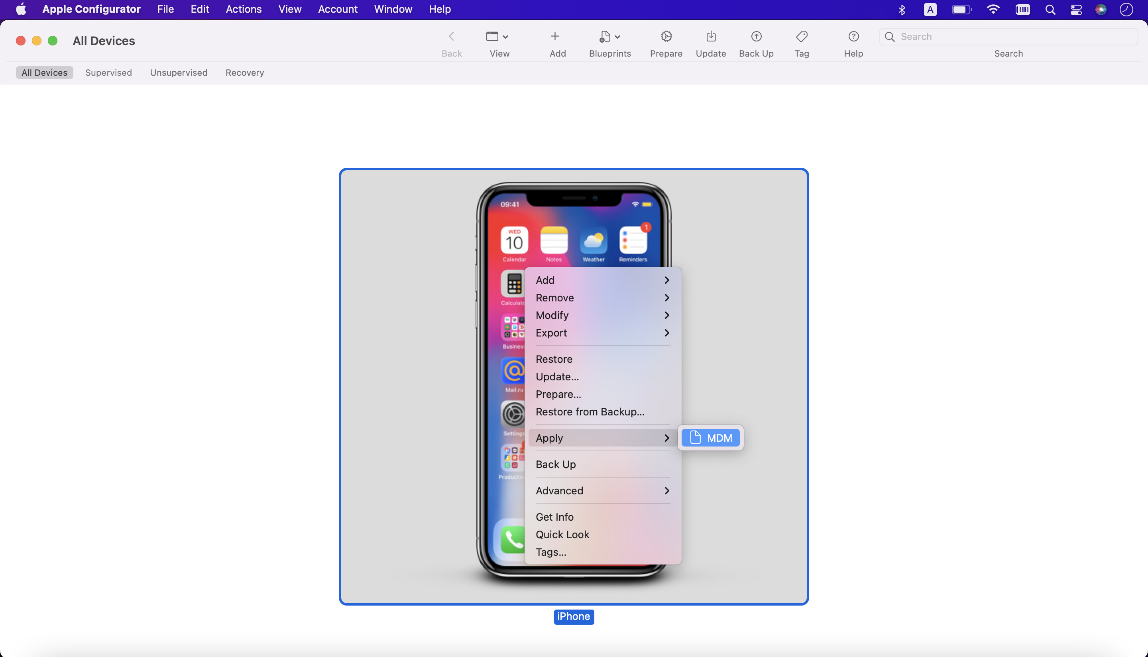
Kaseya MDM: Enrollment
NAVIGATION Modules > Integrations > Connectors
NAVIGATION Modules > Devices > MDM Enrollment
PERMISSIONS Connectors > Full access to all Connectors pages
PERMISSIONS Device Management > Add Devices
PERMISSIONS Administrative privileges to manage software on the device to be enrolled and any endpoints assisting in the enrollment
Kaseya offers mobile device management (MDM) for supported devices. This article provides compatibility, prerequisite, and process information pertaining to Kaseya's standalone MDM solution.
To learn how to migrate to Kaseya from another MDM solution, refer to Kaseya MDM: Migrating from another MDM solution.
Prerequisites
Compatibility
Our MDM solution currently supports enrollment for the following Apple operating systems:
- iOS 4.0 and above
- iPadOS 4.0 and above
Permissions
To complete this process, you'll need the following permissions:
- Full access to all Connectors pages.
- Ability to log in to appleid.apple.com with the Apple ID of the device or devices you'd like to enroll.
- If configuring Automated Device Enrollment (ADE), ability to log in to Apple Business Manager with Administrator or Device Enrollment Manager credentials.
Device Enrollment vs. Automated Device Enrollment (ADE)
The two types of Apple MDM connectors available in Kaseya MDM drive your enrollment strategy. For a basic overview, refer to Types of Apple MDM connectors in the Kaseya MDM: Connectors article.
Device Enrollment
To enroll devices in Kaseya MDM using QR code or USB enrollment methods, you'll perform the following steps:
- Configure an Apple MDM Push Certificate connector in Kaseya MDM. Refer to Create an Apple MDM Push Certificate connector in Kaseya MDM.
- Create a push certificate in the Apple portal and upload it to Kaseya MDM. Refer to Create a push certificate.
- Enroll devices one at a time into Kaseya MDM. Refer to Manually enroll a device in MDM.
ADE
To configure automatic Kaseya MDM-enrollment of devices assigned to a dedicated server in Apple Business Manager, you'll perform the following steps:
- Configure an Apple MDM Push Certificate connector in Kaseya MDM. Refer to Create an Apple MDM Push Certificate connector in Kaseya MDM.
- Create a push certificate in the Apple portal and upload it to Kaseya MDM. Refer to Create a push certificate.
- Create an Apple Automated Device Enrollment connector in Kaseya MDM, and generate an MDM server token in Apple Business Manager to upload to Kaseya MDM. Refer to Configure Automated Device Enrollment (ADE).
ADE behavior
After configuring ADE, every device assigned to the newly added MDM server in Apple Business Manager automatically appears in Kaseya MDM and is added to the agent group specified in the connector. The following applies to devices processed through ADE:
- These devices are enrolled in supervised mode, granting full control over device configurations and ensuring compliance with organizational policies. Refer to Kaseya MDM: Supervised vs. non-supervised devices.
- These devices will receive all the assigned configuration profiles, ensuring consistent and secure device management across the organization.
- Non-activated devices appear on Kaseya MDM device pages as offline with an Enrollment status of Unenrolled. They do not consume licenses until activated.
- These devices are activated in Kaseya MDM once they are turned on and undergo standard Apple device setup/activation. During this process, the Remote Management screen will show that the device is enrolling into remote management by your Kaseya MDM instance. Once activated, the Enrollment status on Kaseya MDM device pages changes to Enrolled, and MDM Commands become available. Refer to Kaseya MDM commands.
How to...
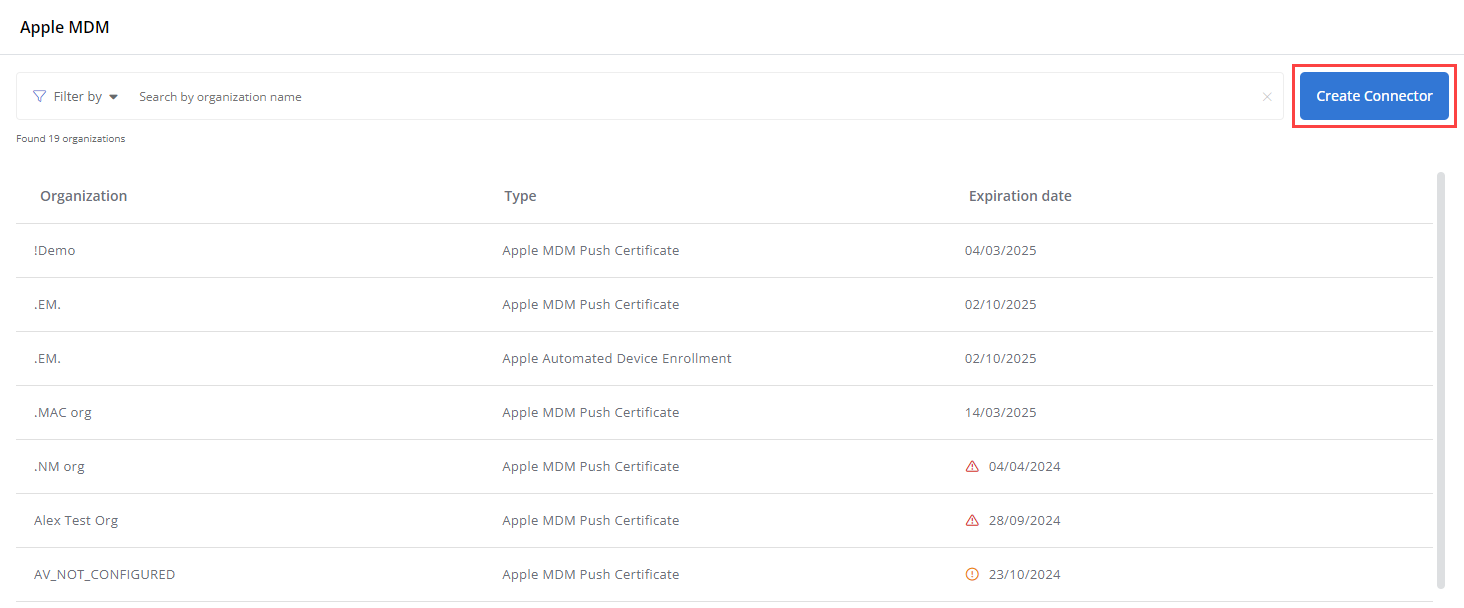
You'll start the MDM enrollment process by creating a new entry for the device on the Connectors page. To do so, perform the following steps:
- From the left navigation menu in Kaseya MDM, navigate to Integrations > Connectors > Apple MDM.
- Click Create Connector.
- On the Create Connector page, select the Apple MDM Push Certificate connector type from the Type drop-down menu.
- Select the organization with which the new device will be associated.
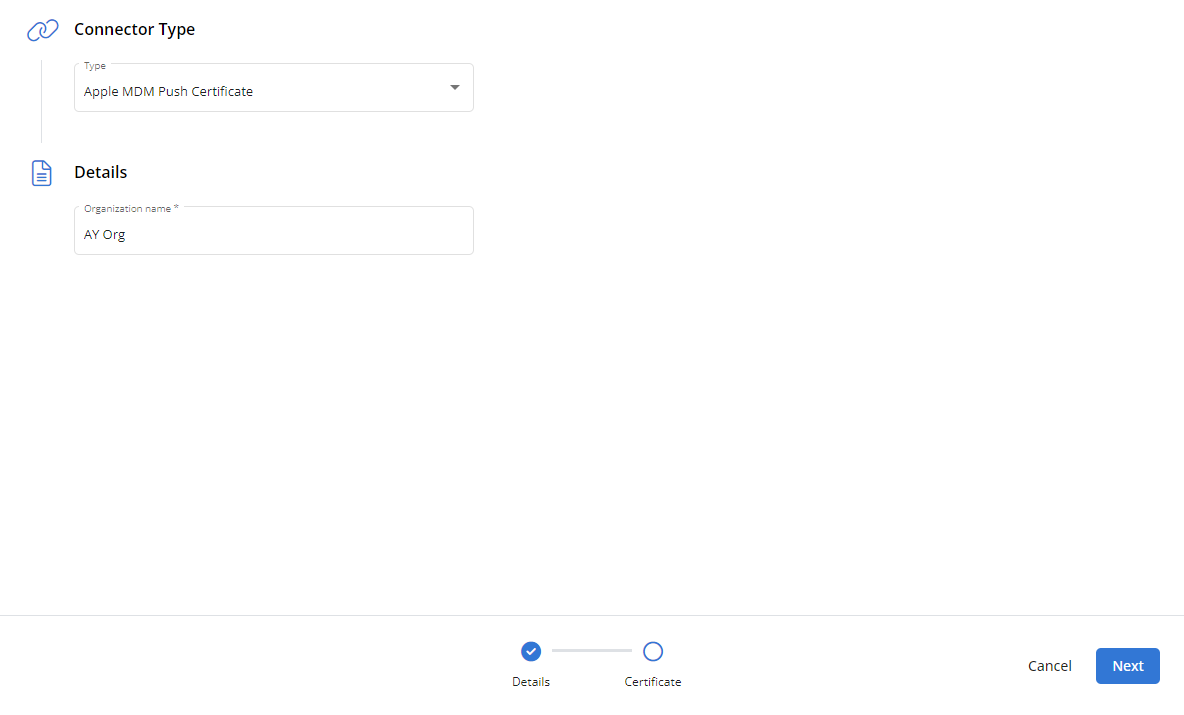
- Click Next.
- In the Download CSR File section, click Download CSR. Kaseya MDM will transfer a Certificate Signing Request (CSR) file named CertificateSigningRequest.plist to the default download location on your computer.
- In the Create the Apple Push Certificate section, click Go to Apple portal.
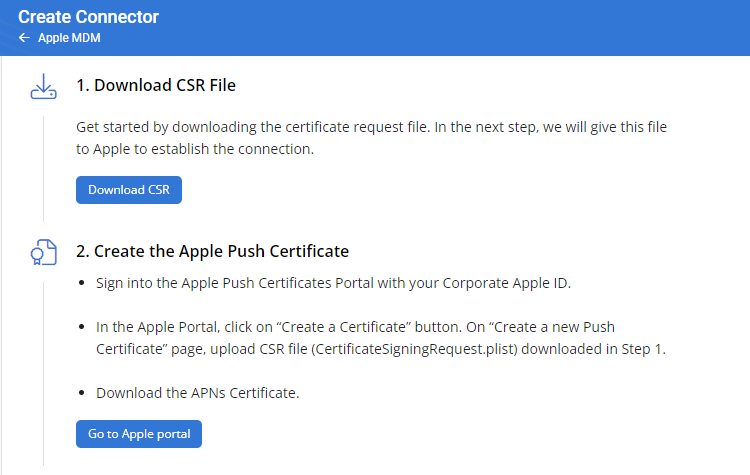
- Without closing the Create Connector page, perform the steps described in Create a push certificate to continue.
Once you've completed the steps in Create an Apple MDM Push Certificate connector in Kaseya MDM, follow this process to obtain a vendor-signed version of the CSR file and upload it to Kaseya MDM to create your new push certificate:
Create the Apple Push Certificate
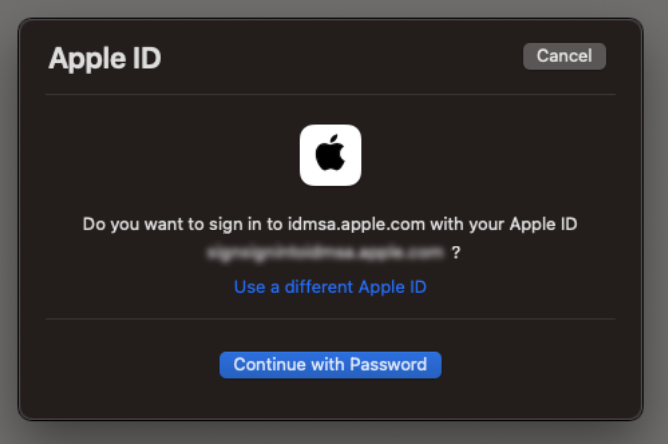
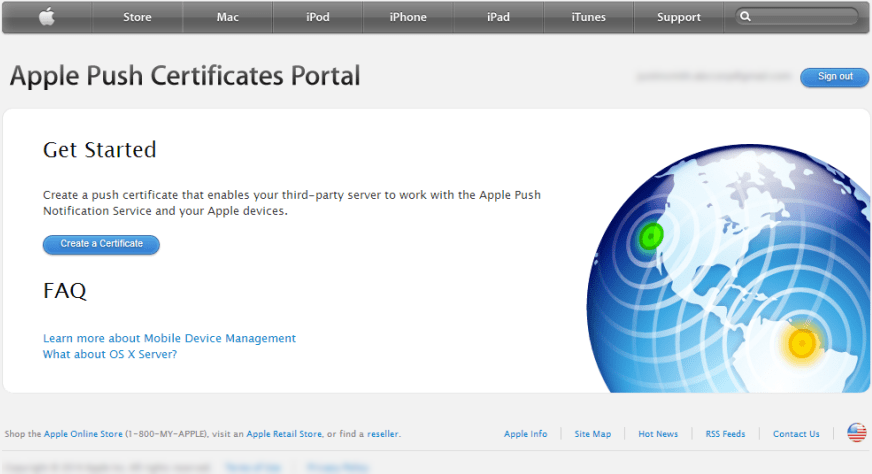
- The Apple Push Certificates Portal will open and prompt you for credentials. Log in with the Apple ID of the device or devices you'd like to enroll.
- Click Create a Certificate.
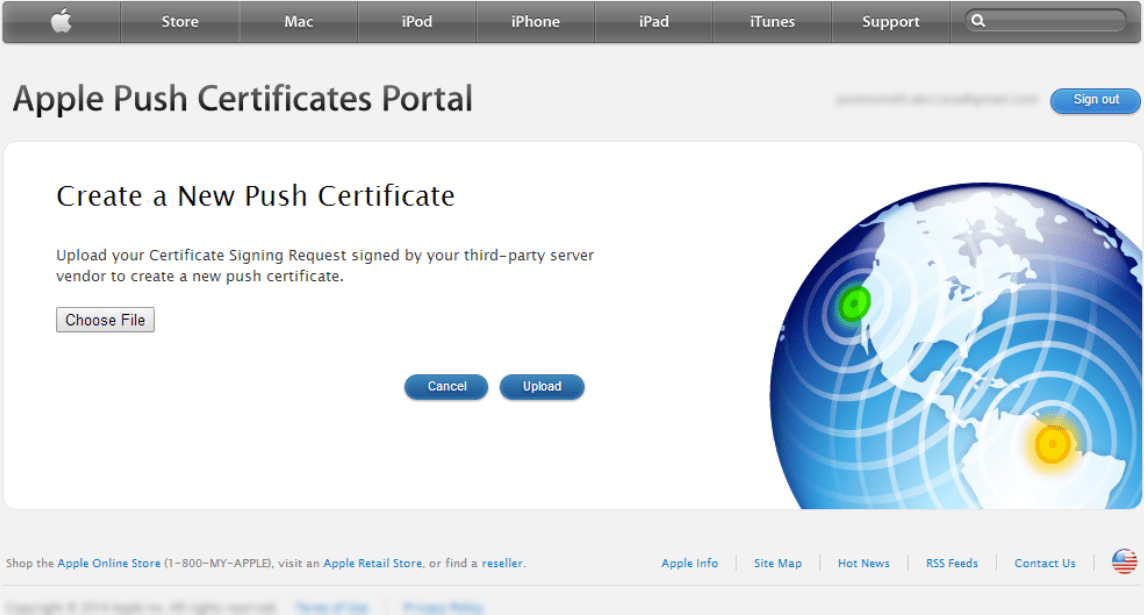
- The Apple portal will prompt you to accept the MDM Certificate Agreement Terms of Use. Once you've done so, you'll receive a prompt to upload your CSR file.
- Click Choose File. Select the CSR you generated in Create an Apple MDM Push Certificate connector in Kaseya MDM. Then, click Upload.
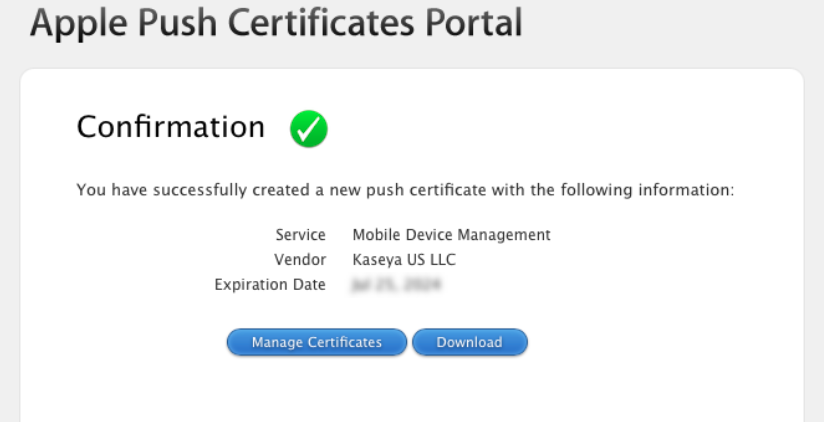
- The Apple portal will surface a confirmation that you've successfully created the push certificate. Click Download.
- Continue to the next section of this article.
Upload the push certificate to Kaseya MDM
- Return to the Create Connector page in Kaseya MDM and locate the Upload the Apple Push Certificate section.
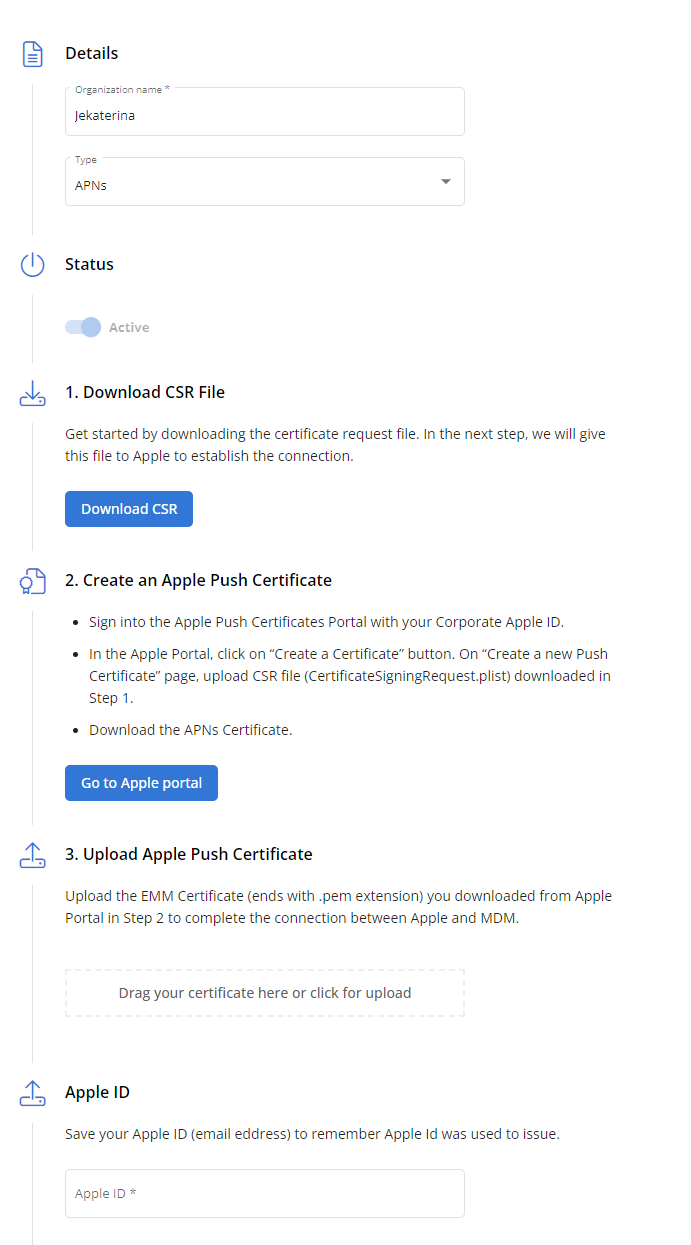
- Add the certificate you downloaded from the Apple portal by dragging it into the Drag your certificate here box or by clicking the box and selecting the file to upload.
- Confirm the ID you used to create the certificate by entering it in the Apple ID field.
- Click Create. Then, proceed to either Manually enroll a device in MDM or Configure Automated Device Enrollment (ADE).
After creating the signed CSR and uploading it to Kaseya MDM, you can enroll the device in MDM manually as follows.
Alternatively, if you wish to configure automatic Kaseya MDM-enrollment of devices assigned to a dedicated server in Apple Business Manager, skip these steps and proceed to Configure Automated Device Enrollment (ADE).
- From the left navigation menu in Kaseya MDM, navigate to Devices > MDM Enrollment.
- In the Context section, select the organization, site, and group where the device will reside.
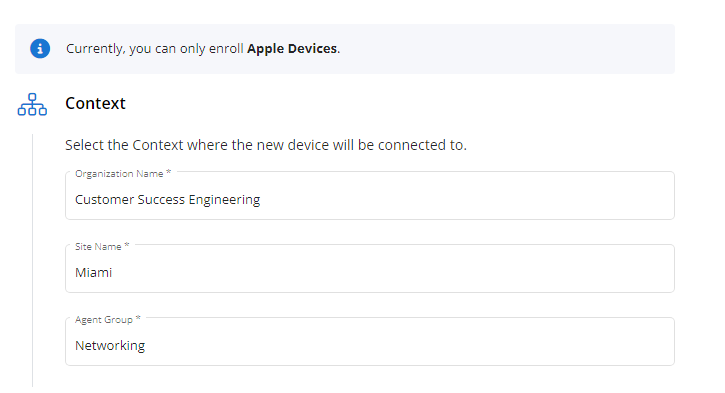
- From the Enroll Path drop-down menu, select the method via which you'd like to enroll the device in MDM: QR Code and Link or USB using Apple Configurator.
QR code enrollment is intended for personal (BYOD) iOS and iPadOS devices. To enroll a device via either of these methods, perform the following steps:
- A Scan QR Code pane, similar to the example shown below, will appear on the MDM Enrollment page.
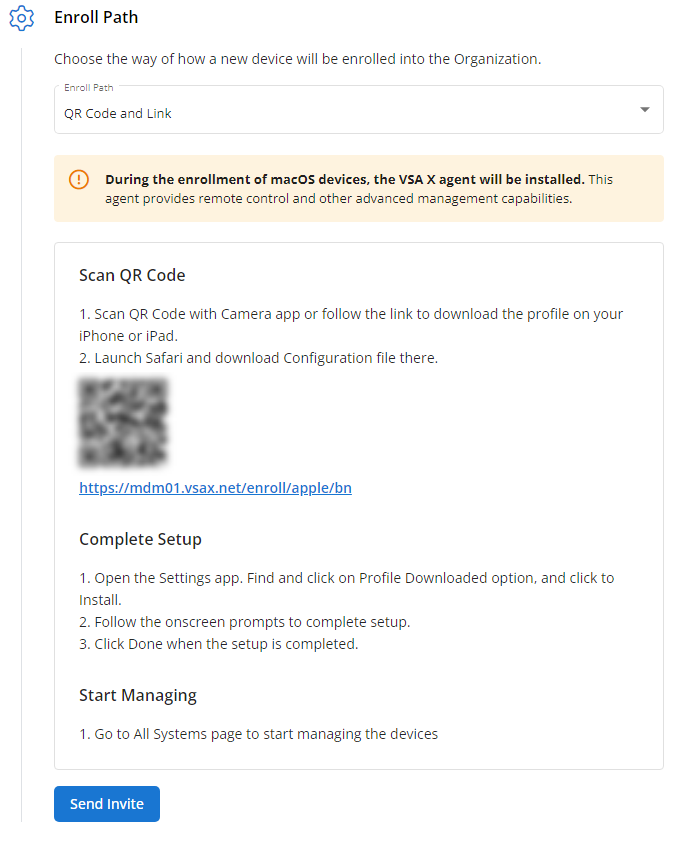
- Follow the workflow it provides to complete the device enrollment. To send the instructions to a recipient via email, click Send Invite, complete the required contact fields, and click Send.
- Once the enrollment process is complete, the device will become available to manage on Kaseya MDM's Device List page.
IMPORTANT The USB enrollment method will erase your device.
This enrollment type is intended for business or corporate-owned devices and enables additional management capabilities. Currently, it only supports iOS and iPadOS devices. To enroll a device via this method, perform the following steps:
- A USB pane, similar to the example shown below, will appear on the MDM Enrollment page. To send the instructions to a recipient via email, click Send Invite, complete the required contact fields, and click Send. Otherwise, proceed to the next step of this workflow.
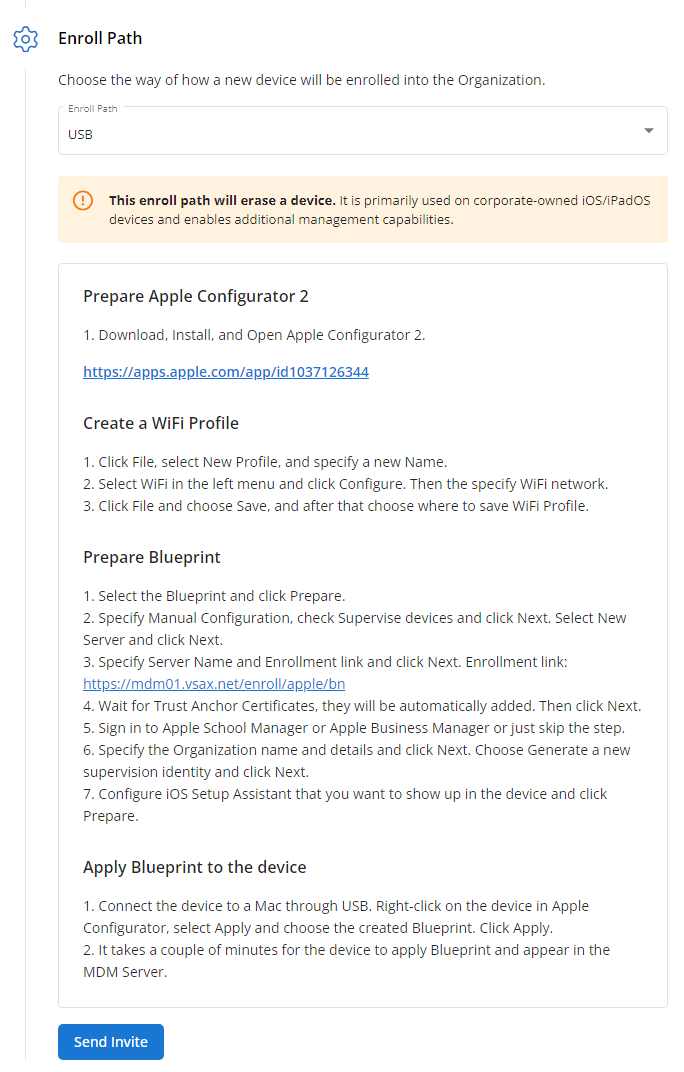
- On a separate device, download and install Apple Configurator 2. You'll use this device to enroll the managed endpoint. You can obtain this application from the Mac App Store.
- Once the application is installed, proceed to the next step.
Create a WiFi profile
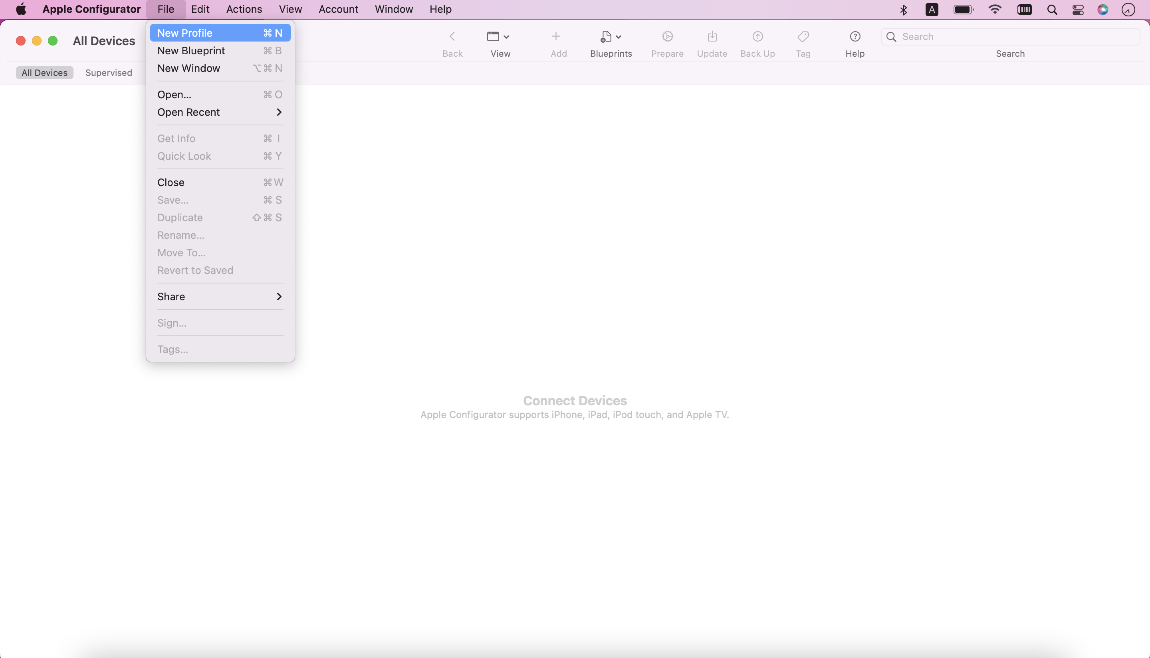
- In Apple Configurator's top navigation menu, click File > New Profile.
- In the window that opens, on the General tab, enter a profile name in the Name field.
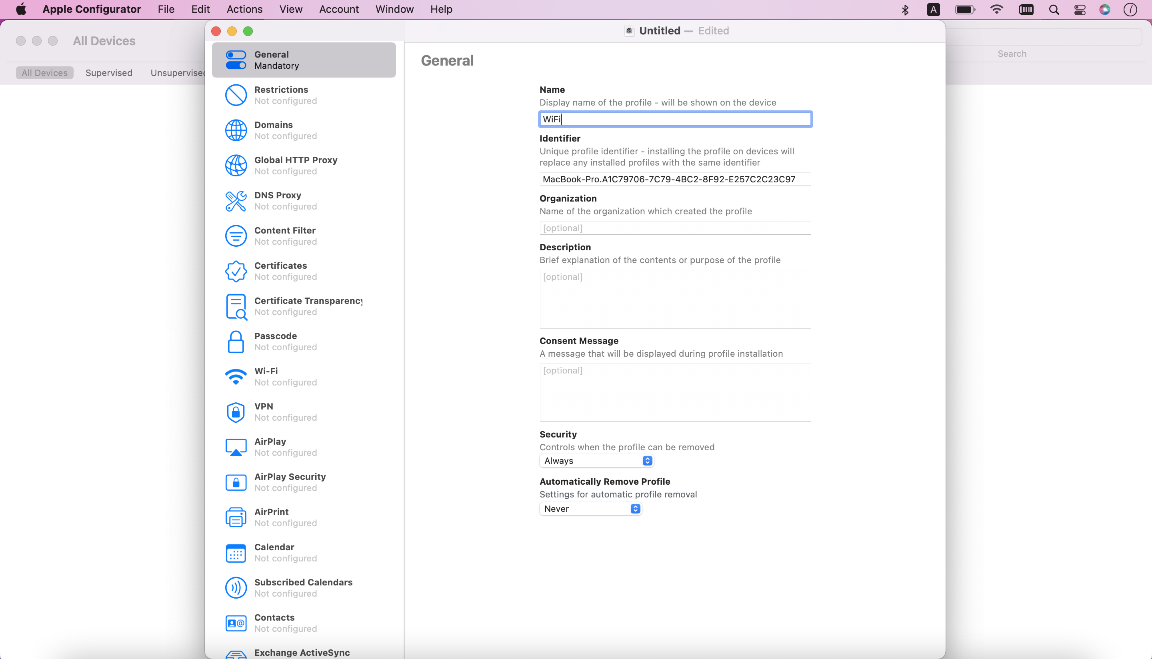
- In the left navigation menu, select WiFi.Then, click Configure.
- Input the settings of the WiFi network to which the device should connect.
- In Apple Configurator's top navigation menu, click File > Save.
- When prompted, save the file in a location that you will be able to access in the next steps of this article.
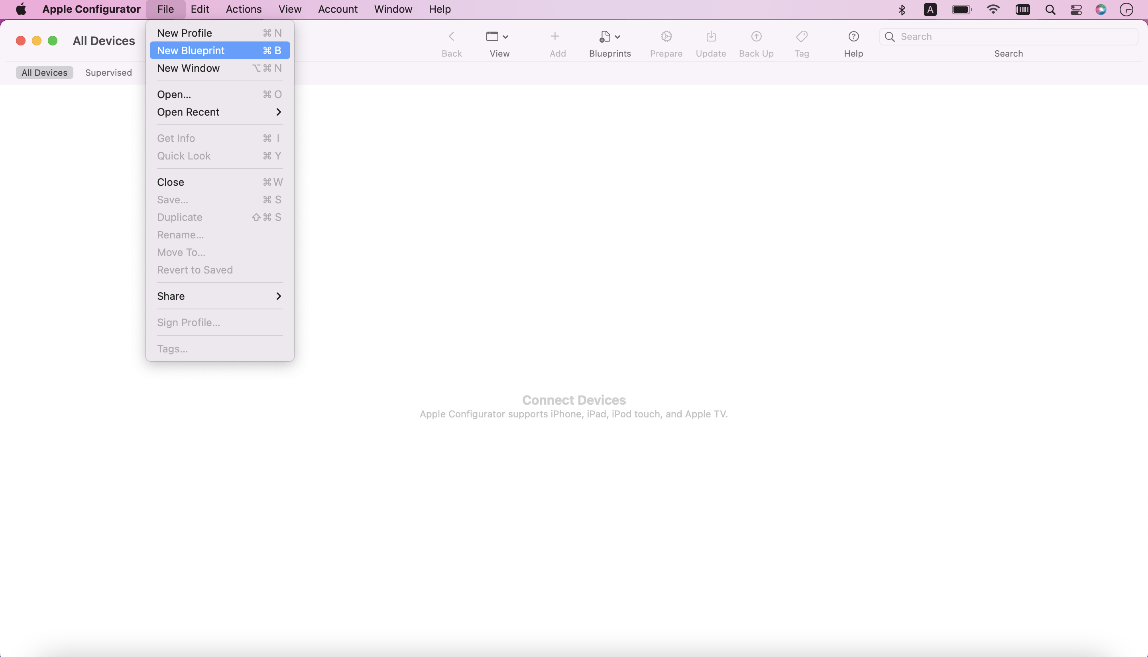
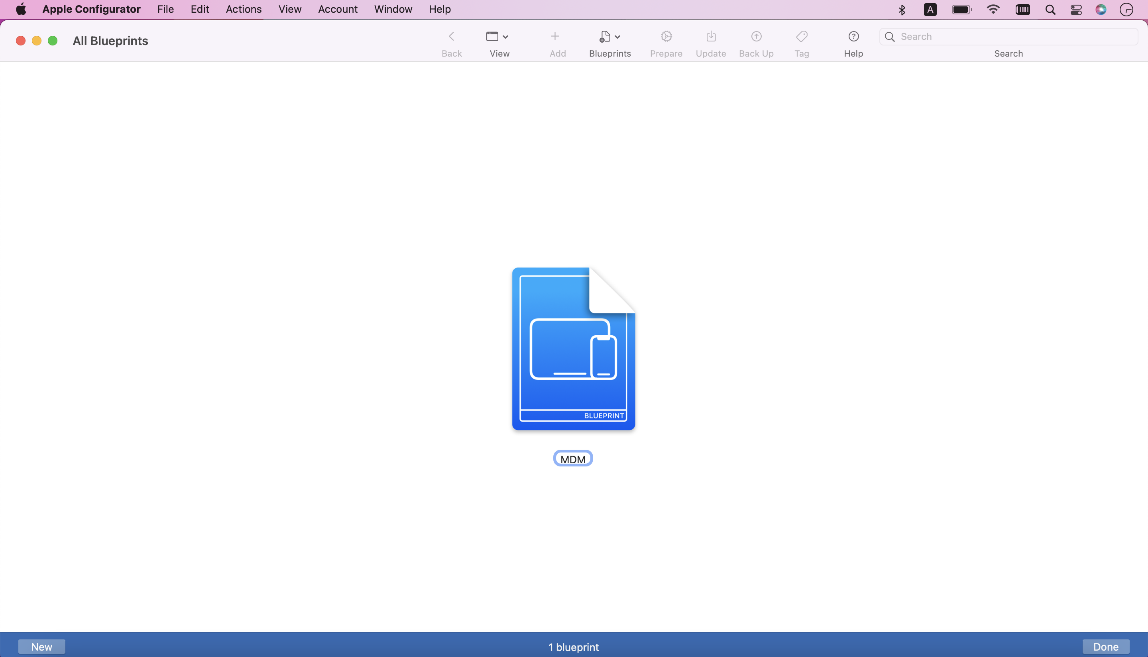
Create a blueprint
- In Apple Configurator's top navigation menu, click File > New Blueprint.
- Specify a blueprint name.
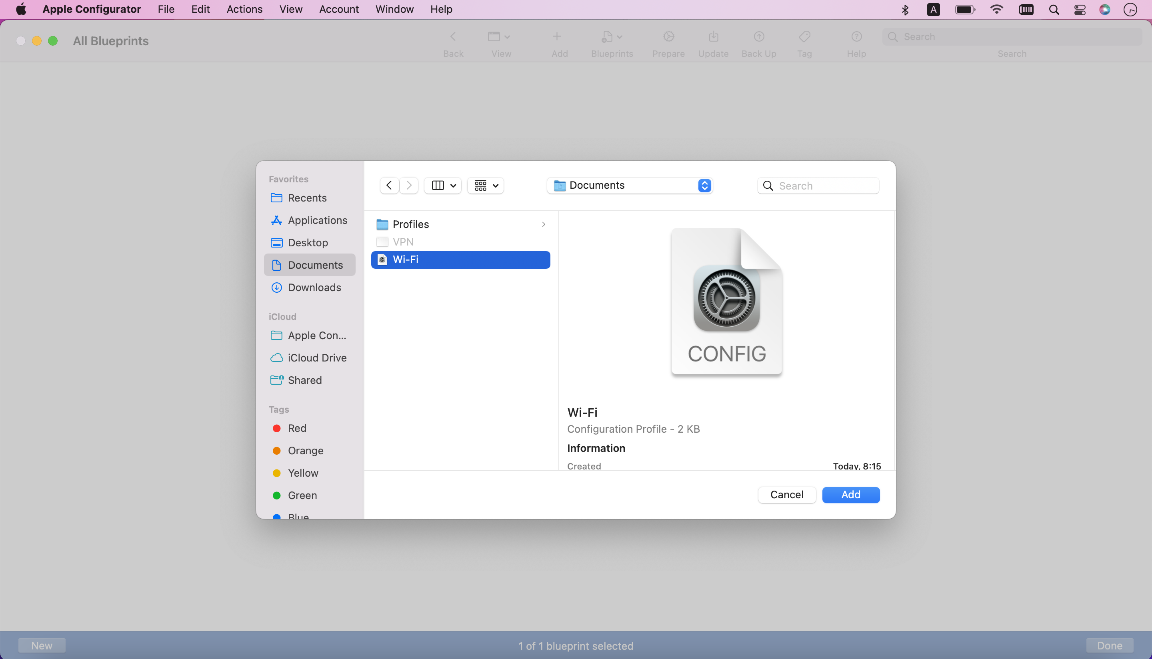
- Click the blueprint. Then, click Add > Profiles.
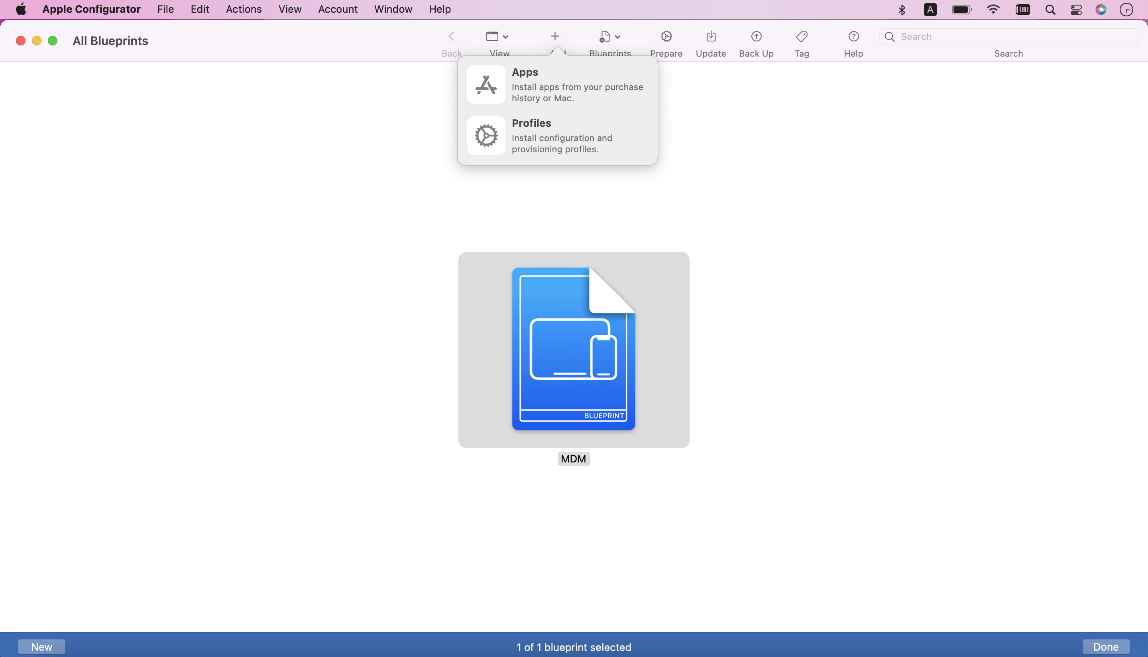
- Select the WiFi profile you created in the previous section of this article and click Add.
Prepare the blueprint
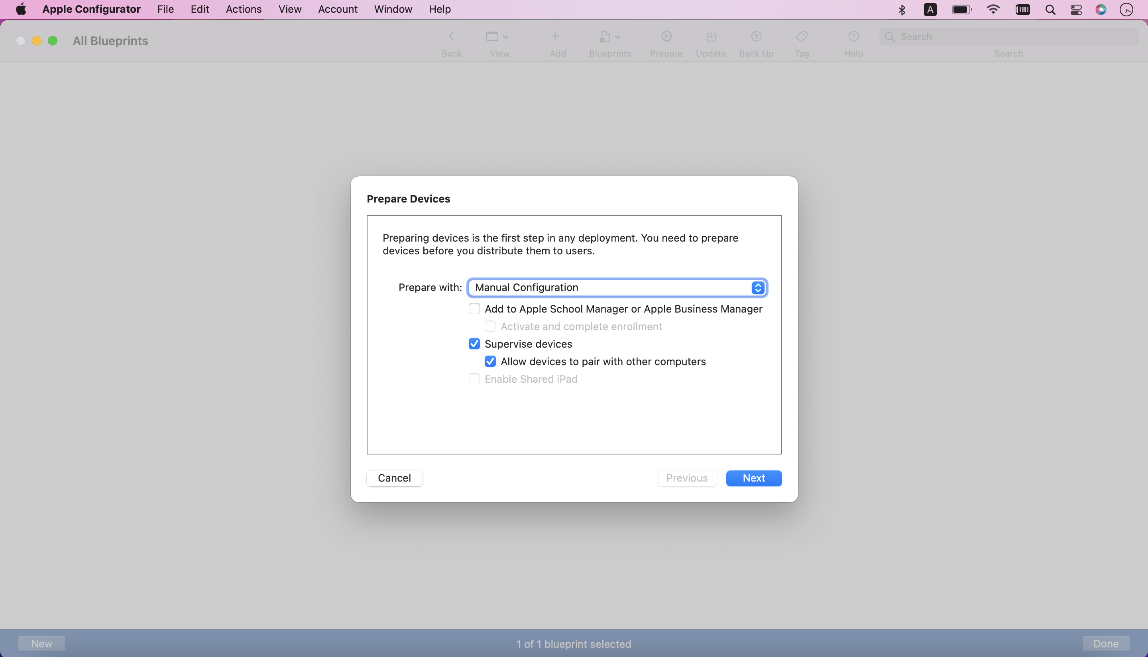
- Click the blueprint. Then, click Prepare.
- In the Prepare Devices window, select Prepare with > Manual Configuration.
- Ensure that the Supervise devices check box is selected.
- Click Next.
- On the Enroll in MDM screen, click Server > New Server. Then, click Next.
- On the Define an MDM Server screen, input VSA in the Name field.
- In the Host name or URL field, enter the enrollment link URL from the USB pane on the MDM Enrollment page.
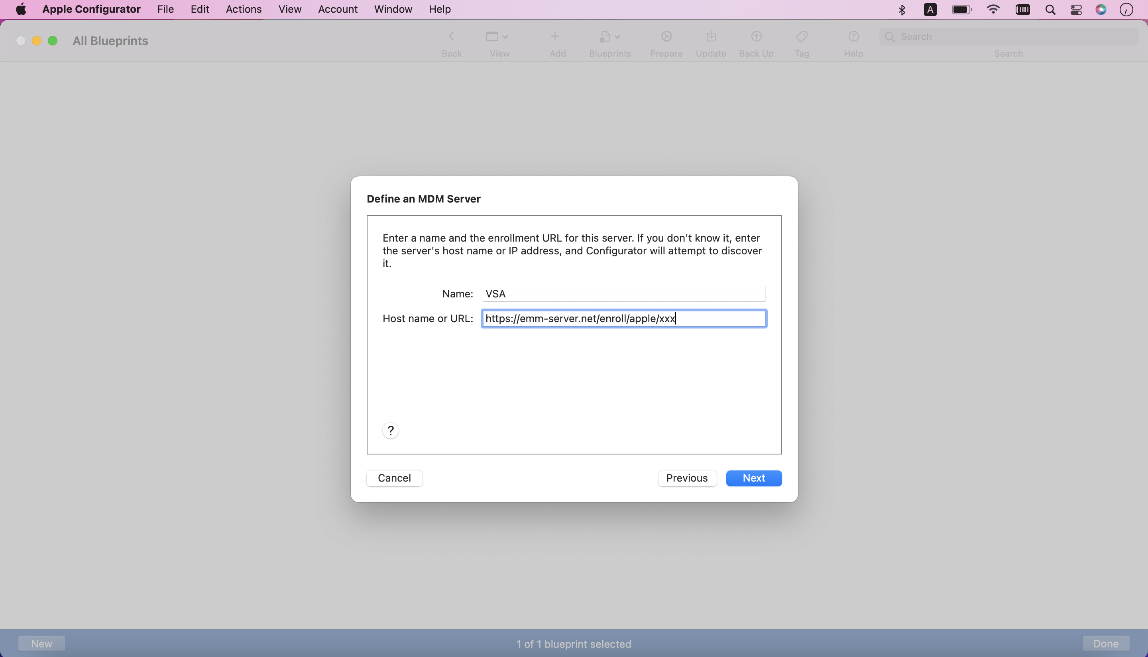
- Apple Configurator will fetch and add your trust anchor certificates. Click Next.
- You may be prompted to sign in to Apple School Manager or Apple Business Manager. You can do so, or you can skip the step.
Create an organization
- On the Create an organization screen, define the name of the organization with which this device will be associated. Then, click Next.
- When prompted, select Generate a new supervision identity and click Next.
- The Configure the iOS Setup Assistant screen will appear. Make any desired selections.
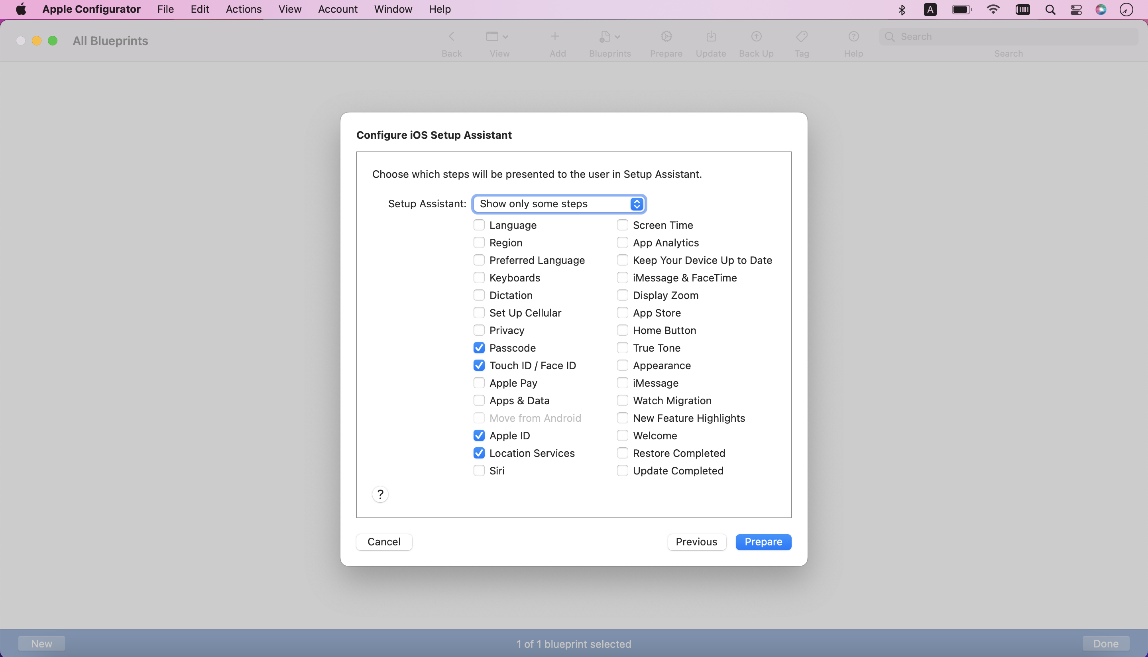
- Click Prepare.
Apply the blueprint to the device
- Via USB, connect the device you're enrolling to your current desktop or laptop computer.
- In Apple Configurator, right-click the device, select Apply, and choose the blueprint you created.
- Click Apply.
- Apple Configurator will apply the blueprint. It may take several minutes for this process to complete and the new device to index in the MDM server. Once the enrollment process is complete, the device will become available to manage on Kaseya MDM's Device List page.
BEFORE YOU BEGIN You must create an Apple MDM Push Certificate connector for the organization you wish to configure ADE for. Refer to Create an Apple MDM Push Certificate connector in Kaseya MDM.
By completing the following steps, every device assigned to a dedicated MDM server within Apple Business Manager will automatically be added to a specified agent group within your Kaseya MDM account:
Create an Apple Automated Device Enrollment connector in Kaseya MDM
- From the left navigation menu in Kaseya MDM, navigate to Integrations > Connectors.
- Click Create Connector.
- On the Create Connector page, select the Apple Automated Device Enrollment connector type from the Type drop-down menu.
- Select the organization and site associated with the devices you wish to automatically enroll.
- Select the specific agent group in which the devices will be automatically enrolled.
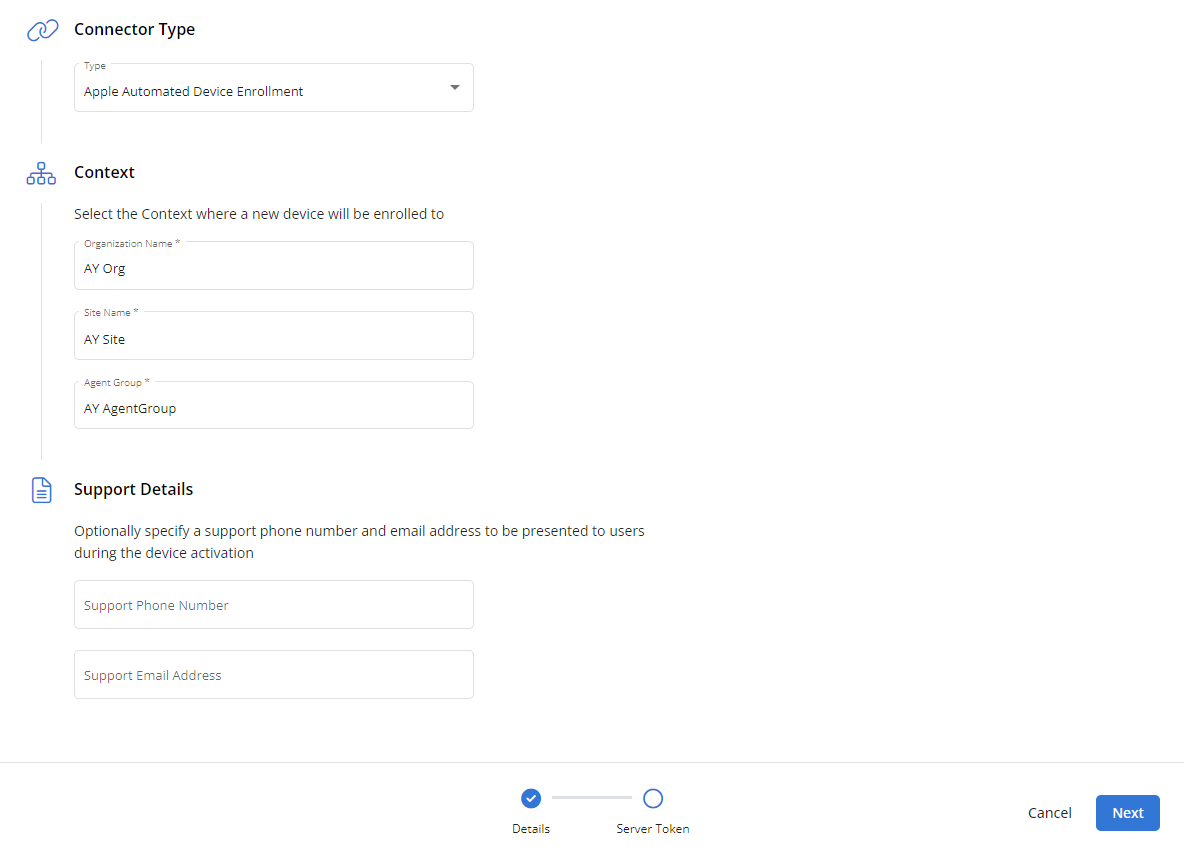
- Optionally, enter a phone number and/or email address at which your support team can be reached, which users will see during device activation.
- Click Next.
- Click Download Public Key. Kaseya MDM will transfer a Privacy Enhanced Mail (PEM) file named ABM_Public_Key.pem to the default download location on your computer.
- In the Generate New Server Token section, click Go to Apple Business Manager.
- Without closing the Create Connector page, log in to Apple Business Manager and proceed to the next section.
NOTE The Organization Name field displays an error message if the selected organization is missing an Apple MDM Push Certificate connector, which you must configure first. Refer to Create an Apple MDM Push Certificate connector in Kaseya MDM.
Upload the public key to Apple Business Manager
- In Apple Business Manager, click your name at the bottom of the sidebar and select Preferences.
- Click MDM Server Assignment, then click Add
 .
. - Enter a unique name for the server.
- Upload the ABM_Public_Key.pem file you downloaded from Kaseya MDM in the previous section.
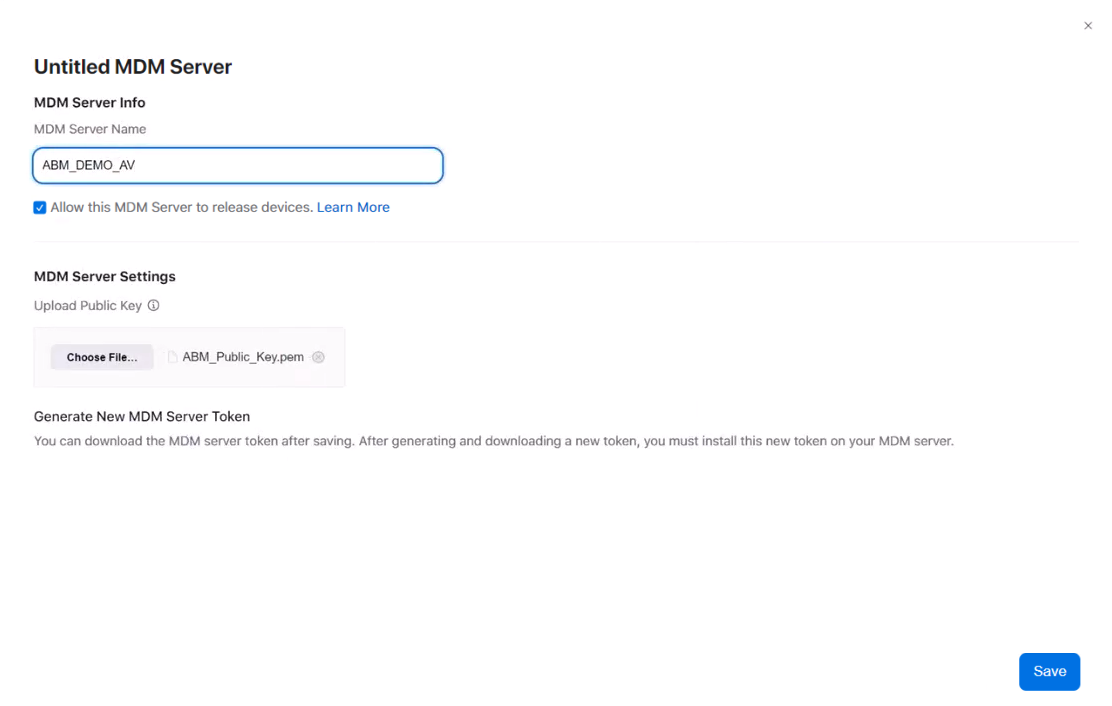
- Click Save.
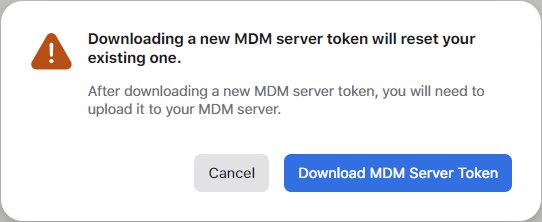
- Click Download MDM Server Token
 .
. - In the confirmation dialog box, click Download MDM Server Token.
NOTE If you don’t want this MDM server to have the ability to release devices, refer to Release devices in the Apple Business Manager User Guide.
Upload the server token to Kaseya MDM
- Return to the Create Connector page in Kaseya MDM and locate the Upload Server Token section.
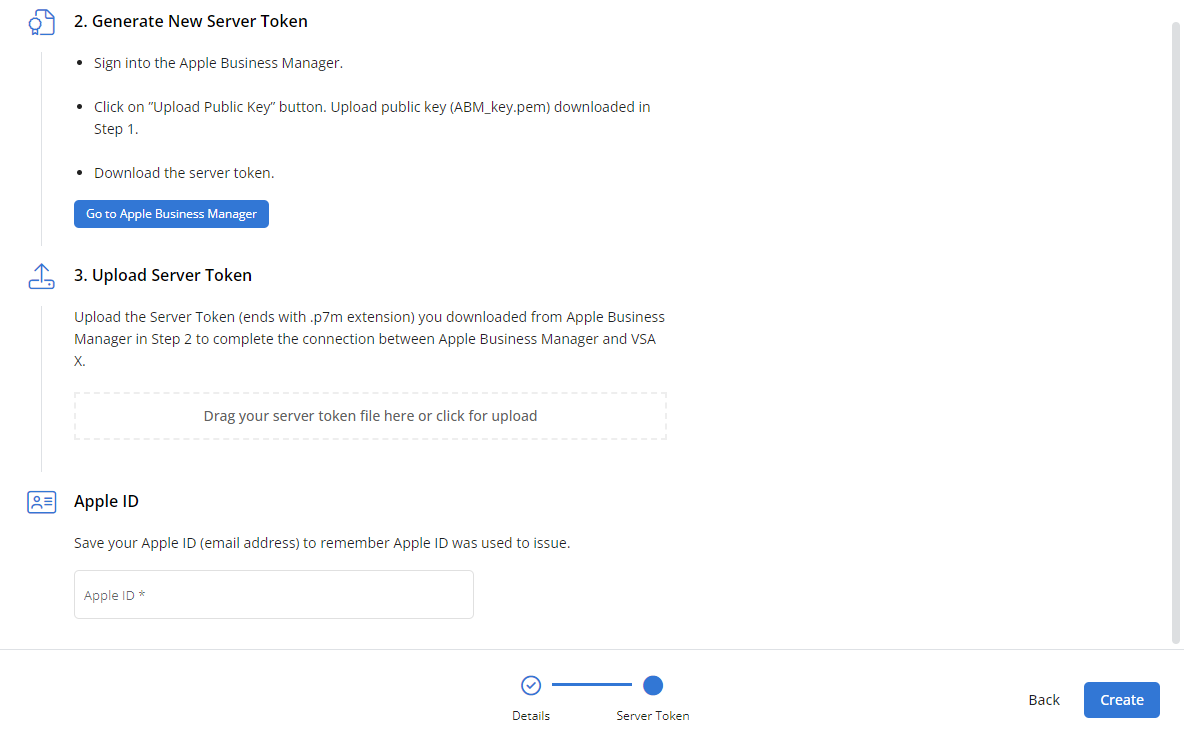
- Add the .p7m server token file you downloaded from Apple Business Manager by dragging it into the Drag your server token file here box or by clicking the box and selecting the file to upload. The server token upload success will be validated.
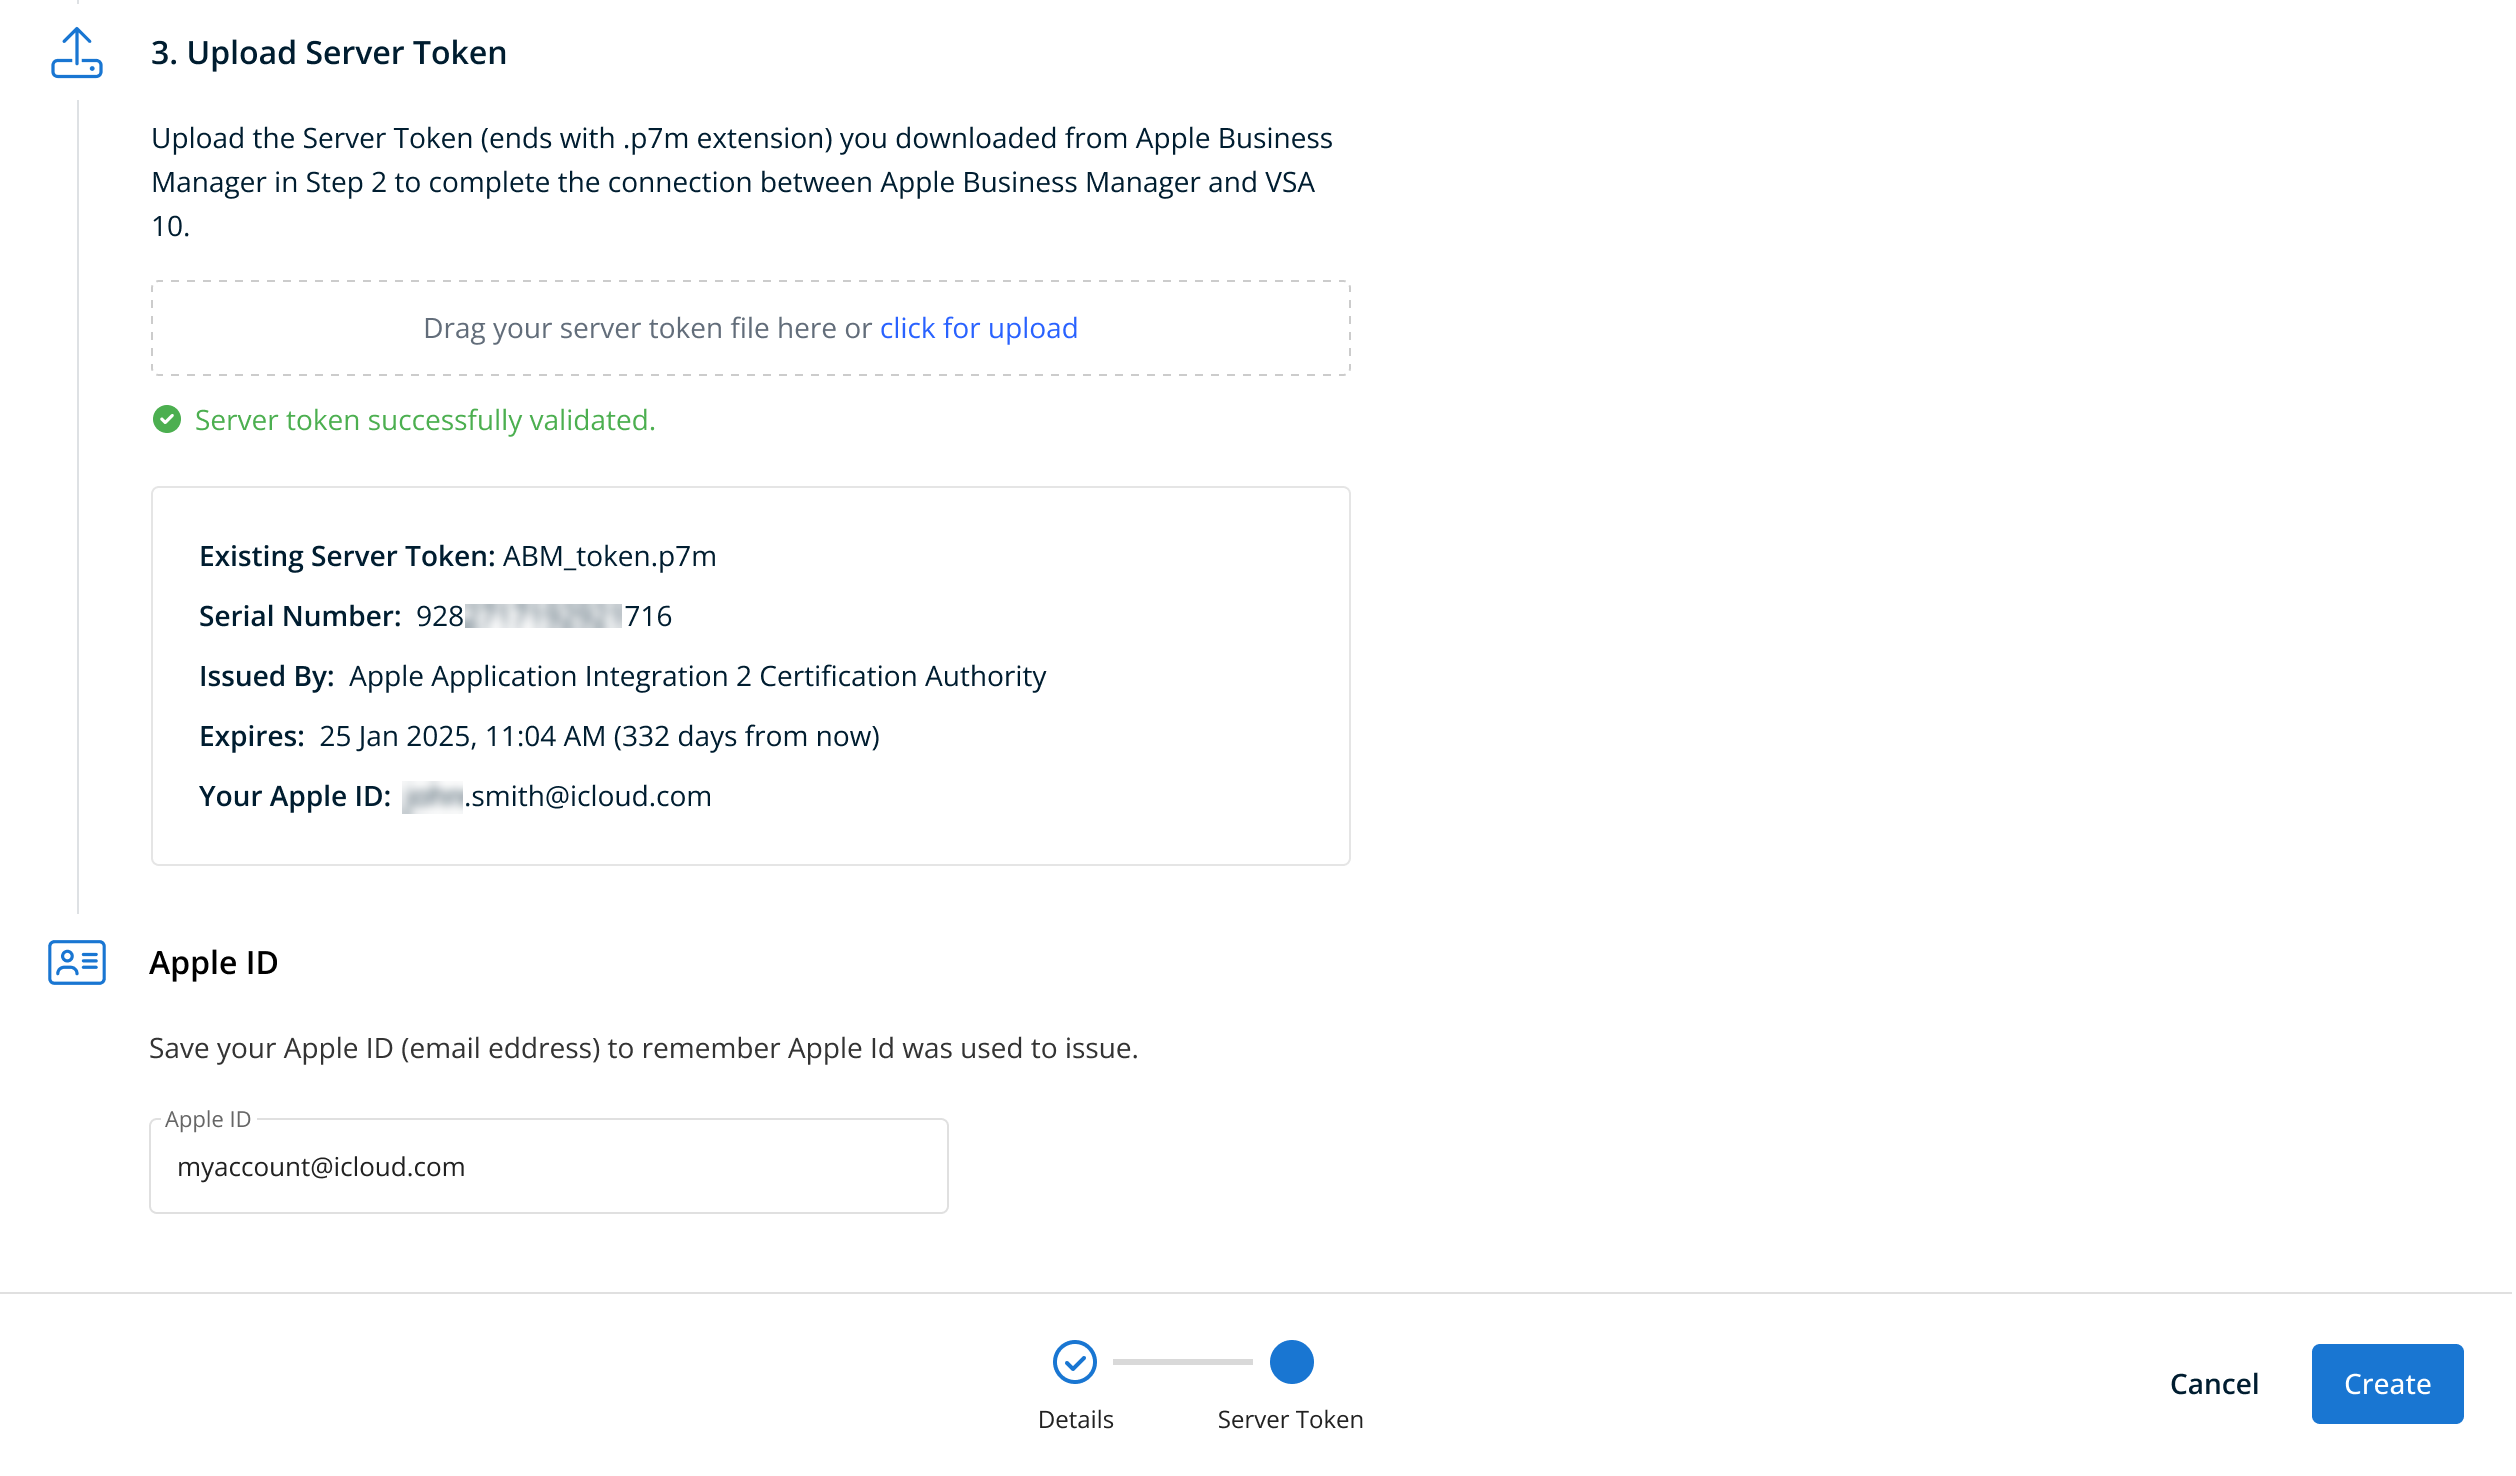
- Confirm the ID you used to generate the server token by entering it in the Apple ID field.
- Click Create.
For more details, refer to ADE behavior.
To unenroll a device from MDM, perform the following steps:
- Locate VPN & Device Management in the device's settings.
- Open the MDM profile.
- Click Remove Management.
- Kaseya will automatically remove the device from your MDM platform.
Kaseya MDM commands
Once you've enrolled a device in MDM, the following commands will become available. Note that availability of any command is dependent on both the device type and enrollment method used.
| Command | iOS/iPadOS | |
| QR code enrollment | USB enrollment | |
| Non-supervised | Supervised | |
| Restart | FALSE | TRUE |
| Shutdown | FALSE | TRUE |
| Enable/Disable lost mode | FALSE | TRUE |
| Play Lost Mode Sound | FALSE | TRUE |
| Erase | FALSE | TRUE |
Refer to Kaseya MDM: Supervised vs. non-supervised devices.
Next step: Configuring Apple MDM profiles
After a device completes the enrollment process, any configuration or management policies you've defined for its type will automatically apply. For more information, refer to Kaseya MDM: MDM profiles.


